


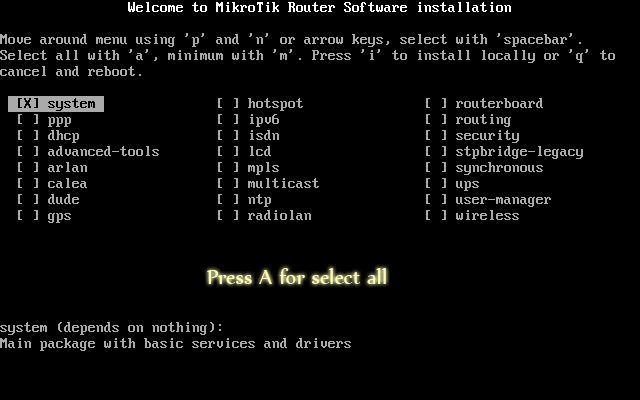
First,,you must download the iso file of Mikrotik router OS from mikrotik.com,Then write iso image file on CD,put in cdrom and turn on :
Press "a" key for select all and then press "i" , Answer "n" to first question and "y" to second
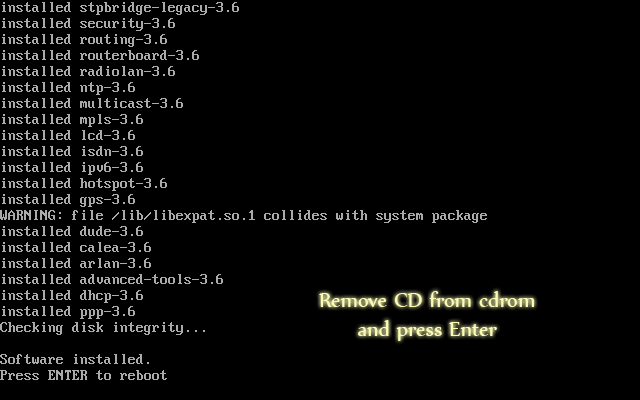
installation complete, remove cd from cdrom and press "Enter"
after rebooting type "admin" as login and no password.
When mikrotik prompt is ready assign ip to NIC: /ip address
add address=192.168.1.2/24 interface=ether1
add address=192.168.0.1/24 interface=ether2
ether1 = WAN ( Connected To Your Router ) Alone -- ether2= LAN ( Connected To Your Switch (hub) With Clients --
now add gateway ip:
/ip route
add gateway=192.168.1.1 << your IP modem >>>
if use your ip now you can ping internet
ping 8.8.8.8
8.8.8.8 64 byte ping: ttl=242 time=255 ms
8.8.8.8 64 byte ping: ttl=242 time=243 ms
8.8.8.8 64 byte ping: ttl=242 time=247 ms
8.8.8.8 64 byte ping: ttl=242 time=243 ms
4 packets transmitted, 4 packets received, 0% packet loss
round-trip min/avg/max = 243/247.0/255 ms
NAT Configuration :
nat will use until client with invalid ip connect to internet, so we must run nat on mikrotik and set client ip in range of 192.168.0.2 and set client gateway to 192.168.0.1(Secend NIC of mikrotik)
/ip firewall nat
add chain=srcnat action=masquerade out-interface=ether1
just it,,,,it's very easy :D
Read more “How to Install Mikrotik Router OS” »»
Thursday, 25 March 2010
How to Install Mikrotik Router OS
Saturday, 14 March 2009
How to Make windows XP bootable from USB flash Memory
 In my previous posting, I also have to write a tutorial on how to install windows xp using flash memory (indonesian version ) and how to install windows vista using flash memory, many are still confused in the post because I do not use sreenshot. This time I try to make a tutorial with the same ease the process works.
Download the software in need:
1. PeToUSB
2. BootSect
3. USB_Prep8
Lets go ... follow this step
PART 1 - Formatting
1. flash memory input / pendrive in usb port
2. ekstract all software to a folder on your hard drive directory, for example, in drive D, rename the folder, for example USB.
use WinZip or winrar for the ekstract.
3.Copy PE2USB.exe to folder USB_PREP8.
Double click the file usb_prep8.cmd is in the folder USB_PREP8.
So windows will appear on your monitor as a picture
Press any keyboard key to continue. (Just follow the instructions), Window PE2USB will appear on your monitor. You do not need to change anything.
Click Start button, then press Yes
After formated is complete, close the windows PEtoUSB, Remember! only PEtoUSB windows, do not close the Command Prompt window. Comand it will appear like the image below
Press any keyboard key to continue. (Just follow the instructions), Window PE2USB will appear on your monitor. You do not need to change anything.
4.Insert your Windows XP CD
- Press 1 to select the drive where the windows installation files are located, (Change XP Setup Source Path, currently)
A window will appear and select the drive containing your Windows XP setup CD . Click [OK]. For example, in E, click there, ok
- Select a menu number 3) Change Target USB-Drive Letter, currently
Type the drive letter that contains your USB Flash Disk. In my example is drive F:
- Select number 4, Make New TempImage with XP LocalSource and Copy to USB-Drive - Press Y to start the formatting
- Press any key to continue the process
Press yes to copy temporary files to usb
yes
Yes
Press any key to end all the process ..
PART II - Installation
1. Before you begin the installation make sure that the booting sequence is set up so that your first boot from a USB Flash Disk.
how to setup the BIOS menu, turn on the computer / laptop, press F2 after computer / laptop is turn on
2. After entering the BIOS menu select the "boot order"
3. On Boot Order you can select the boot sequence that is required is : 1. USB Hard Drive / Flash Drive, sequence number 2 to the other but usually content with your DVD / CD Drive.
4. Click Save and Exit, the computer will restart.
5. If all goes smoothly, at the time the computer will turn back to boot from a USB Flash Drive and you will show the options menu
6. Select the [TXT Mode Setup Windows XP, Never Unplug USB Drive Until After logon].
IMPORTANT: Do not pull out/unplug the USB Flash Drive to a Windows XP installation is completed entirely.
7. Windows XP setup will start. Do as if you are using exactly CD, just follow the instructions .
8. After the setup finished copying files to your hard drive, setup will make the computer restart.
9. IMPORTANT: Select the [GUI Mode Setup Windows XP, Continue Setup + Start XP].
Windows Setup will continue to use the display setup GUI (Graphical User Interface) while copying from a USB Flash Drive.
10. Continue installation as usual. If you are finished you can pull unplug the USB Flash Drive.
Read more “How to Make windows XP bootable from USB flash Memory” »»


How to solve problem Missing File SKU011.CAB Microsoft Office 2003
 Have you experienced problems while running applications Microsof office 2003? Each run or open exel document format like xls, and so will always show the dialog box installer Missing FILE SKU011.CAB.
The solution can use the Office CD installer, select the repair, you can also solve them through the registry. Please follow these easy steps
Click START -> RUN -> in the text area type regedit
Once you take it to the windows registry editor, Double Click on
Expand HKEY_LOCAL_MACHINE -> select SOFTWARE -> MICROSOFT -> OFFICE -> 11.0 -> DELIVERY
, and then click on the unique ID or DownloadCode (eg 90000409-6000-11D3-8CFE-0150048383C9), on the right side, double-click -> CDCache. Change the value data or the number to be 0.
Done, now you can try to open the exel document, if the problem is only SKU011.CAB Missing File, you can solve the problem using this tips.
Read more “How to solve problem Missing File SKU011.CAB Microsoft Office 2003” »»
Tuesday, 10 March 2009
How to Install windows Vista bootable from USB Flash Memory
 After some time ago that I write how to install windows XP using a flash memory, this time I will try to discuss how to install windows vista using the flash memory. I think that the way to install windows vista also using the same way on windows XP and use the same application, is not so, although in principle the concept of both the same, but to install Vista using the Flashdisk/flash memory or create bootable much easier to compare the install windows XP using a flash memory
There are many benefits to install a operation system using the flash Memory, the main advantages is that the process be calculated very quickly.
prepare :
Requirements:
* USB Flash Drive / flahsdisk (Minimum 4GB )
* Vista installation files or windows 7
* Computer or laptop that you have installed windows vista
1. Plug Usb Port Flashdisk to your computer or laptop
2. Open command prompt (on vista), click [start menu] select [Run] and type cmd and enter
I assume that the previous USB flash disk addressed as disk 1, and as hard disk 0.
3. typing the following list and enter :
DISKPART
SELECT DISK 1
CLEAN
CREATE PARTITION PRIMARY
SELECT PARTITION 1
ACTIVE
FORMAT FS = NTFS (Wait until the formatting process is finished)
Assign
EXIT
Do not close the window comandprompt , simply minimize it
Now Insert Vista installation DVD, or if you have an ISO file you will be able to create a virtual drive using Nero applications such as Drive Image or Daemontools. I prefer to use this way, faster and efesien.
Open or maksimize commandpromt before, this time we assume that the DVD Drive you have in the directory "E", and flashdrive on the drive "H"
Type the following command in the previous window commandprompt
E: CD BOOT hit enter, "E" is your DVD drive. You can change it according to the location your DVD Drive,
then type the following command:
CD BOOT hit enter,
then type the following command
BOOTSECT.EXE / NT60 H:
enter , remember, Drive "H" is the location of your USB, you can adjust the location of your USB.
After all process is finished, now you can copying and pasting all the files on the DVD Drive to your USB flash memory. If completed, so now you can use your USB flashmemory to media installation.for the first, setting up the BIOS to first boot option is to use flashmemory.
All these tutorials are personal experiences and I try and succeed, if there is a problem in this process, please leave your comment, I will try to answer it
Few tips for XP users, if you want to try this tutorial, you can use the Vista USB live edition to formatting process.
Read more “How to Install windows Vista bootable from USB Flash Memory” »»
Cara Menambah RAM menggunakan Flashdisk
 Setelah beberapa waktu yang lalu saya menulis artikel bagaimana mengoptimalkan kinerja komputer yang bisa anda baca disini dan tulisan tentang cara menginstall windows dengan menggunakan flashdisk, kali ini kita bahas tentang bagaimana cara menambah RAM dengan menggunakan Flashdisk. Loh,,,emang bisa...? ya iyalah...
Memang sih ..bukan hal baru lagi Bagaimana cara menambah RAM atau Random Access Memory dengan menggunakan media Flashdisk , tapi mungkin masih ada yang belum tau caranya dan membutuhkan solusi.
Secara umum Random Access Memory (RAM), merupakan bagian memory yang bisa digunakan oleh user untuk menyimpan program dan data. Nah masalah akan timbul ketika data yang disimpan dan data yang di akses sudah tidak berimbang dengan kapasitas RAM atau memory itu sendiri, Biasanya yang terjadi, kinerja komputer akan lamban, solusinya terpaksa kita harus mengupgrade Memory atau RAM dengan kapasitas yang lebih tinggi, Nah,,kalo udah gini timbul masalah baru lagi,kenapa ? ya iya dong,,karena kita harus merogoh kocek dalam-dalam untuk membeli RAm yang baru,,bisa ga jadi kencan tuh,,soalnya lumayan mahal harganya,Apa lagi RAM yang DDR 1 , waduwh,,
Tapi sekarang ga perlu bingung2 lagi , orang2 pinter di luar sana sudah memikirkan alternatif solusi untuk masalah seperti ini..salah satu caranya dengan memaksimalkan fungsi flashdisk.
Dalam windows vista yang di kenal sangat berat karena banyak menggunakan memory, Microsoft memasukan aplikasi yang dinamakan Readyboost.
aplikasi ini adalah aplikasi yg sengaja di tanam oleh pihak microsoft untuk meningkatkan performa dari windows vista sendiri..
karena untuk menjalankan windows vista diperlukan banyak memory.
Fungsi dari readyboost itu sendiri adalah,menambah kapasitas memory/ram dengan menggunakan UFD/flash disk.
disarankan menggunakan UFD yg besar kapasitasnya minimal 2 kali besar memory internal dari komp/NoteBook
cara penggunaanya pada vista sangat mudah..
klik kanan pada directory UFD anda,dan pilih properties-->readyboost-->pilih use the device-->atur spaca yg kita ingingkan,disarankan full/maksimal--->selessai.
Cuma yg perlu di perhatikan...tidak semua UFD yg mendukung aplikasi readyboost,sebaiknya kalo mau bli,di tannyakan dulu sama penjualnya,apakah sudah support readyboost atau belum.
Nah..untuk vista sudah selesai,silahkan dicoba sendiri ya...sekarang sy sedang tidak menggunakan vista,jadi kalo ada kekeliruan,di maklumin aja,tapi garis besar caranya seperti yg sudah saya terangkan..
Terus..bagaimana dengan yg menggunakan OS XP..
jangan khawatir...
ini sedikit petunjuk..
Untuk pengguna XP,kita harus menggunakan aplikasi tambahan..karena kalo di XP belum ada aplikasi ready boost..
salah satu softwarenya yang bisa menggantikan fungsi readyboost pada Vista adalah Eboostr.
nah apa aja kehebatan dari software ini,ini beberapa kutipan dari publishernya :
-Memory caching (if you have plenty of RAM installed);
-Exclude list (the most requested feature);
-Power saving mode;
-More than 4GB cache file size (on NTFS file system only);
-One flash drive use on different computers;
-Unlimited number of files in cache;
-Build cache process improvement (including initial statistics used from XP prefetch information);
-Load balancing mechanism improvements;
-And many small fixes and enhancements;
-And finally 16 new languages added: Portuguese, Ukrainian, Finnish, Czech, Danish, Hungarian, Bulgarian, Polish, Korean, Swedish, Sinhalese, Lithuanian, Arabic, Belarusian, Japanese and Thai.
kita setting dikit dulu ya ...
klik kanan di icon mycomputer,terus pilih properties-->advance-->setting pada performance-->advance-->change-->pilih set-->pilih directory ufd/nama ufd -->pilih no paging file-->sett..finish..restart dulu ya..
nah sekarang kita lakukan penyetingan pada eboostr nya..
install dulu..kalo blm di install yg ga isa dung,,
jalankan --->pilih add--->pilih flashdisknya-->sett full pada "select the cache size ( terserah mau full ato ga )-->ok-->build cache...finish..coba sekarang reastart,,,rasakan bedanya,,,selamat mencoba
Download Eboostr last version
download and enjoy
Read more “Cara Menambah RAM menggunakan Flashdisk” »»
How To Install windows Vista From Flashdisk
Setelah beberapa waktu yang lalu saya menulis cara menginstall windows XP menggunakan flashdisk , kali ini saya akan mencoba membahas bagaimana caranya menginstall windows vista menggunakan flashdisk. Sebelumnya saya berfikir bahwa cara menginstall windows vista juga menggunakan cara yang sama pada windows XP dan menggunakan aplikasi yang sama pula , ternyata tidak demikian , walaupun pada dasarnya konsep kerja keduanya sama , tapi menginstall Vista dengan menggunakan Flashdisk atau membuat Vista bootable jauh lebih mudah di bandingkan menginstall windows XP dengan menggunakan flashdisk.
Ada banyak keuntungan menginstall Suatu operation system dengan menggunakan flashdisk , kelebihan utamanya adalah prosesnya yang terbilang sangat cepat di banding menggunakan media DVD R/CD R , dengan menggunakan cara ini kita juga dapat memperpanjang usia DVD atau CD R kita , karena proses penginstallan yang cukup lama bisa membuat Optic dari DVD/CD R laptop atau computer kita semakin lemah.
Hal yang perlu di persiapkan untuk proses penginstallan Windows Vista menggunakan media flashdisk :
Requirements:
*USB Flash Drive / flahsdisk (Minimum 4GB)
* Vista installation files atau windows 7
* Komputer atau laptop yang sudah terinstall windows vista
1. Tancapkan Usb Flashdisk ke Port computer atau laptop anda
2. Buka command prompt ( pada vista ) , klik [ start menu ] pilih [Run] dan ketikan cmd dan enter
Sebelumnya Saya asumsikan bahwa USB flash disk dialamatkan sebagai disk 1, dan harddisk sebagai disk 0.
3. ketikan perintah-perintah berikut ini pada windows comandprompt tadi dan enter:
DISKPART
SELECT DISK 1
CLEAN
CREATE PARTITION PRIMARY
SELECT PARTITION 1
ACTIVE
FORMAT FS=NTFS (Tunggu sampai proses pemformatan selesai)
ASSIGN
EXIT
Jangan tutup jendela comandprompt tadi , cukup minimize saja
Sekarang masukan DVD installasi Vista , atau jika anda memiliki file ISO nya anda bisa membuat virtual Drive dengan menggunakan aplikasi seperti Nero Image Drive atau Daemontools Saya lebih suka menggunakan cara ini , lebih cepat dan efesien.
Buka atau maksimize commandpromt tadi , kali ini kita asumsikan bahwa Drive DVD anda ada di direktori “E” sedangkan letak flashdisk anda ada di Drive “H”
Ketikan perintah berikut pada jendela commandprompt yang sebelumnya
E:CD BOOT kemudian enter Ingat “E” adalah DVD drive anda. Anda bisa menggantinya sesuai dengan Letak Drive DVD anda ,
kemudian ketik perintah berikut :
CD BOOT lalu enter ,
kemudian ketik perintah berikut
BOOTSECT.EXE /NT60 H:
lalu enter , ingat, Drive “H” adalah letak USB anda , anda bisa menyesuaikan dengan letak USB anda.
Setelah semua proses itu selesai , sekarang anda tinggal mengcopy paste semua file yang ada di Drive DVD ke USB flashdisk anda . Jika sudah selesai , maka sekarang anda sudah bisa menggunakan USB flashdisk anda untuk porses Installasi dengan terlebih dahulu mensetting BIOS dengan pilihan first Boot nya dengan menggunakan flashdisk.
Semua tutorial ini adalah pengalaman pribadi dan sudah saya coba dan berhasil , jika ada masalah pada proses ini , silahkan tinggalkan komentar anda , saya akan mencoba membantu sebisanya.
Sedikit tips buat anda pengguna XP jika ingin mencoba tutorial ini , anda bisa menggunakan Vista live USB untuk proses pemformatan flahsdrive anda.
Sebenarnya ada satu cara lagi yang bisa di gunakan untuk mengisntall vista dengan flashdisk bahkan melalui computer yang terinstall XP sekalipun , saya akan bahas di tutorial berikutnya.
Selamat mencoba….
Read more “How To Install windows Vista From Flashdisk” »»
Thursday, 5 March 2009
Leawo Free YouTube Download

Leawo Free YouTube Download is a fully free YouTube downloader that can download FLV files from YouTube, Yahoo, Google, MySpace, iFilm, Dailymotion, Metacafe, etc.
With this YouTube downloader, you can easily and breezily download FLV files via the multiple advanced download methods of auto sniffer download and directly dragging FLV to program icon download. It also can directly set to convert FLV to video in any formats with Leawo FLV Converter.
Download Flash videos of all kinds from all websites.
You can download videos of any kind and from any website, YouTube, Google, Yahoo, MySpace, DailyMotion, blogs,etc.
Easiest tool ever for downloading YouTube videos
Simply drag the video thumbnail on YouTube to the program will start to download the video you like. The program supports to download all the Flash videos you have seen on YouTube too.
Easy to use
The "Get it" plugin is embedded in the IE browser, and the program will pop up a dialog window asking you to download the video. This makes it one stop to download the Flash video.
Download Youtube download
Supports Windows 2000, 2003, XP, Vista
Read more “Leawo Free YouTube Download” »»
Easy Button & Menu Maker

With Easy Button & Menu Maker you can easily create sophisticated buttons and professional dynamic menus for your website while investing just a few minutes of your time. More than 100 elegant design templates are included, reflecting various design styles such as so called Glass and Vista style.
Unlike most other menu tools, Easy Button & Menu Maker provides direct WYSIWYG visual menu editor, so it is much easier and pleasant to work with. Menus created with Easy Button & Menu Maker are quick, compact and compatible with all modern web browsers.
View button maker and menu maker samples
Key Features
* Easily create cool web buttons
* Easily create dynamic multi-level website menus
* Direct visual WYSIWYG menu editor
* Use fonts of your choice
* Add icons to the buttons and menus
* Easily insert created buttons and menus in your website
* All Web browsers and systems are supported
* The generated code is valid and standards compliant
* GIF, PNG and JPEG image formats are supported
* UTF-8 Unicode is supported
Special Benefits and Advantages
Why choose Easy Button & Menu Maker?
* You get 2 great tools in a single package – button maker and menu maker
* Very latest Glass and Vista visual styles are supported
* Best value on the market, prices start from only $19.85
* Created menus are fast and lightweight
* Created menus do not require any additional software like Java and Flash
* Created menus are search engine friendly
* Generated code is valid according to XHTML 1.0 and CSS standards
* Choose between pure list-oriented and table-oriented HTML output
All Web browsers are supported
* Firefox
* Internet Explorer
* opera
* Google Chrome
* and other browser
Download Easy Button & Menumaker
Supports Windows 2000, 2003, XP, Vista
Read more “Easy Button & Menu Maker” »»
Free CSS Toolbox
 Free CSS Toolbox is a freeware productivity software for web developers who work with CSS code.
Free CSS Toolbox includes a number of tools for fast-tracking and enhancing the development of style sheet code, such as an advanced CSS Formatter and CSS Validator.
If you develop websites that use CSS, the Free CSS Toolbox can help you save time and increase productivity without any cost.
Key features and benefits
Simple CSS editor View CSS editor screenshot
* Quickly create and adjust CSS code
* Auto-complete and syntax highlighting makes CSS editing easy
CSS Formatter / Beautifier View CSS formatter screenshot
* Easily re-format any CSS code
* Quickly adjust somebody's else CSS to fit your style
* Make your code pretty and easy to read
CSS Validator / Checker View CSS validator screenshot
* Find and eliminate errors in your code
* Check your CSS against various specifications
* See if your CSS is compatible with older web browsers
CSS Compressor
* Reduce the size of your CSS code by up to 70%
* Make your web pages load faster
Integration with W3C CSS Validator
* Quickly validate your CSS code with the web-based W3C CSS Validator
* Make sure your CSS is up to the CSS Level 2 standard
*Supports Windows 2000, 2003, XP, Vista
Download Free CSS Toolbox
Version: 1.2, File size: 1.5 mb
Read more “Free CSS Toolbox” »»
Wednesday, 4 March 2009
AVG 8.5

AVG Internet Security Home and bussines edition :
Anti-Virus, Anti-Spyware, Anti-Spam, Web Protection & Firewall
Comprehensive protection for Windows against all online threats from the world's most trusted security company. Use the Internet with confidence in your home or small office.
All-in-one protection
* Anti-Virus: protection against viruses, worms and trojans
* Anti-Spyware: protection against spyware, adware and identity-theft
* Anti-Rootkit: protection against hidden threats (rootkits)
* Anti-Spam: filters out unwanted and fraudulent e-mails (anti-phishing)
* Web Shield & LinkScanner: protection against malicious websites
* Firewall: protection against hackers
* System Tools: for easy system management
Easy-to-use, automated protection
AVG Internet Security offers real-time protection, automatic updates, low-impact background scanning for online threats, and instant quarantining or removal of infected files ensures maximum protection. Every interaction between your computer and the Internet is monitored, so nothing can get onto your system without your knowledge. AVG scans in real time:
* All files including documents, pictures and applications
* E-mails (all major email programs like MS Outlook and Thunderbird supported)
* Instant messaging and P2P communications
* File downloads and online transactions such as shopping and banking
* Search results and any other links you click on
Internet security with peace of mind
The new web shield checks every web page at the moment you click on the link to ensure you’re not hit by a stealthy drive-by download or any other exploits. All links on search results pages in Google, Yahoo, and MSN are analyzed by LinkScanner and their current threat level is reported in real-time before you click on the link and visit the site.
Easy system management
The new system tools let you easily configure your privacy settings, connections, and browser plug-ins all in one place.
The best Windows protection - trusted by millions of users
AVG's award-winning antivirus technology protects millions of users and is certified by major antivirus testing organizations (VB100%, ICSA, West Coast Labs Checkmark). View all AVG awards & certifications
No hidden costs
When you purchase an AVG product, everything you need is included in the price for the full license duration - technical support, virus updates, and new program versions. All users of paid AVG products also qualify for generous discounts on subscription renewals and product upgrades.
Flexible licensing
* AVG Internet Security can be purchased online in license packs for 1-10 computers.
* One or two year subscriptions available.
Download AVG Internet Security
Download and enjoy
Read more “AVG 8.5” »»
Sunday, 1 March 2009
CCleaner 2.17.853
 CCleaner is a freeware system optimization, privacy and cleaning tool. It removes unused files from your system - allowing Windows to run faster and freeing up valuable hard disk space. It also cleans traces of your online activities such as your Internet history. Additionally it contains a fully featured registry cleaner. But the best part is that it's fast (normally taking less than a second to run) and contains NO Spyware or Adware!
Advanced features to remove unused and old entries, including File Extensions, ActiveX Controls, ClassIDs, ProgIDs, Uninstallers, Shared DLLs, Fonts, Help Files, Application Paths, Icons, Invalid Shortcuts and more... also comes with a comprehensive backup feature.
Third-party applications
Removes temp files and recent file lists (MRUs) from many apps including Media Player, eMule, Kazaa, Google Toolbar, Netscape, Microsoft Office, Nero, Adobe Acrobat, WinRAR, WinAce, WinZip and many more...
100% Spyware FREE
This software does NOT contain any Spyware, Adware or Viruses.
Cleans the following :
Internet Explorer
Temporary files, history, cookies, Autocomplete form history, index.dat.
Firefox
Temporary files, history, cookies, download history, form history.
Google Chrome
Temporary files, history, cookies, download history, form history.
Opera
Temporary files, history, cookies.
Safari
Temporary files, history, cookies, form history.
Windows
Recycle Bin, Recent Documents, Temporary files and Log files.
Registry cleaner
Download ccleaner 2.17.853
Support windows vista
Read more “CCleaner 2.17.853” »»
Saturday, 28 February 2009
AVG Internet Security
 AVG Internet Security
Anti-Virus, Anti-Spyware, Anti-Spam, Web Protection & Firewall
Comprehensive protection for Windows against all online threats from the world's most trusted security company. Use the Internet with confidence in your home or small office.
All-in-one protection
* Anti-Virus: protection against viruses, worms and trojans
* Anti-Spyware: protection against spyware, adware and identity-theft
* Anti-Rootkit: protection against hidden threats (rootkits)
* Anti-Spam: filters out unwanted and fraudulent e-mails (anti-phishing)
* Web Shield & LinkScanner: protection against malicious websites
* Firewall: protection against hackers
* System Tools: for easy system management
Easy-to-use, automated protection
AVG Internet Security offers real-time protection, automatic updates, low-impact background scanning for online threats, and instant quarantining or removal of infected files ensures maximum protection. Every interaction between your computer and the Internet is monitored, so nothing can get onto your system without your knowledge. AVG scans in real time:
* All files including documents, pictures and applications
* E-mails (all major email programs like MS Outlook and Thunderbird supported)
* Instant messaging and P2P communications
* File downloads and online transactions such as shopping and banking
* Search results and any other links you click on
Internet security with peace of mind
The new web shield checks every web page at the moment you click on the link to ensure you’re not hit by a stealthy drive-by download or any other exploits. All links on search results pages in Google, Yahoo, and MSN are analyzed by LinkScanner and their current threat level is reported in real-time before you click on the link and visit the site.
Easy system management
The new system tools let you easily configure your privacy settings, connections, and browser plug-ins all in one place.
The best Windows protection - trusted by millions of users
AVG's award-winning antivirus technology protects millions of users and is certified by major antivirus testing organizations (VB100%, ICSA, West Coast Labs Checkmark). View all AVG awards & certifications
No hidden costs
When you purchase an AVG product, everything you need is included in the price for the full license duration - technical support, virus updates, and new program versions. All users of paid AVG products also qualify for generous discounts on subscription renewals and product upgrades.
Flexible licensing
* AVG Internet Security can be purchased online in license packs for 1-10 computers.
* One or two year subscriptions available.
Download AVG internet security
Read more “AVG Internet Security” »»
Wednesday, 18 February 2009
apple safari 3.2.2
 Safari offers you a superior Web experience with outstanding performance. Even the most complex of pages load at breakneck speed. In fact, it loads pages more quickly than any other Mac Web browser. But that?s not all. Safari uses the advanced interface technologies underlying Mac OS X to offer you an all-new view of the Web, one that?s much easier to use.
Blazing performance.
The fastest web browser on any platform, Safari loads pages up to 1.9 times faster than Internet Explorer 7 and up to 1.7 times faster than Firefox 2.
Elegant user interface.
Safari’s clean, sleek look lets you focus on the web instead of your browser. The browser frame is a mere one pixel wide. You see a scroll bar only when you need one. You see no status bar by default — a blue progress bar fills the address field as the page loads — giving you more room to browse and view the web.
And with commonly used tools like a Google search field built right into Safari, you can get anywhere on the web faster.
Security.
Now you can enjoy worry-free web browsing on any computer. Apple engineers designed Safari to be secure from day one.
For starters, Safari uses robust encryption to ensure that your private information stays that way. When you browse a secure site, Safari displays a lock icon in the upper-right corner of the browser. If you want to know more about the credentials of a secure site, click the lock icon and Safari displays detailed information about the site’s security certificate.
Safari supports SSL versions 2 and 3, as well as Transport Layer Security (TLS), the next generation of Internet security. Safari uses these technologies to provide a secure, encrypted channel that protects all your information from online eavesdroppers. And Safari lets you use standards-based authentication such as Kerberos single sign-on and X.509 personal certificates, or proprietary protocols like NTLMv2 to log in to secure sites.
Safari also supports a variety of proxy protocols — services that help firewalls control what flows in and out of the network — including Automatic Proxy configuration, FTP Proxy, Web Proxy (HTTP), Secure Web Proxy (HTTPS), Streaming Proxy (RTSP), SOCKS Proxy, and Gopher Proxy.
Pop-up blocking.
Say goodbye to annoying pop-up ads and pop-under windows that clutter up your desktop and distract you from your browsing.
By default, Safari blocks all unprompted new windows. You can open new windows when you click links, but you’ll get no surprises from unexpected, unwanted pop-ups.
Graphics and fonts.
Apple brings the same amazing graphics technology to Safari that's used in Mac OS X to ensure great color in everything from iPhoto to Final Cut Pro. Safari is the only browser that employs advanced color management to deliver web images with the most accurate color possible.
And Safari makes text beautiful and easy to read on all displays thanks to Apple's sophisticated font-rendering technology. Safari smoothes fonts so that they're easy on the eyes but also remain as faithful as possible
to the chosen font. As a result, your favorite websites look the way they were meant to be seen.
With CSS3 web fonts in Safari 3.1, web designers can go beyond web-safe fonts and use any font they want to create stunning new websites using standards-based technology. Safari Graphics and Fonts.automatically
recognizes websites that use custom fonts and downloads them as they’re needed.
OS: Windows XP/Vista
Download apple safari 3.2.2
Read more “apple safari 3.2.2” »»
Bywifi Video Downloader v1.3.10
 Bywifi Video Downloader is a free program for downloading, transcoding and accelerating video streaming. It supports downloading, transcoding and P2P accelerating videos from all video websites, such as Youtube, Dailymotion, Metacafe, MySpace, Yahoo, etc. Lots of advanced network technologies like P2SP (peer-to-server-and-peer), multiple tasks, web sensitive, intelligence caching are used in the software. The bitrate of video streaming is 3-5 times faster with bywifi than without it. Moreover, it can transcode videos into mobile formats for mobile phones and PDA.
Features:
* P2P Accelerate Video Streaming:With P2SP, it speeds up downloading speed of video streaming.
* Resume Video Automatically: For the same video, it does not need to buffer again when you close the Web Browser.
* Search Hot Video: You can search video with bywifi. It is easy for u to watch the new, hot and cool video.
* Downloading Video: You can download the video when you watch it. The feature supports IE browser.
* Transcoding Video: You can transcode the video format after downloading the video. The video formats support mobile phone and PDA, such as Nokia, iPhone, SamSung, iPad, iPod, and PSP.
* The software supports Windows 95, 98, Me, NT, 2000, XP, 2003, and Vista.
Supported Video Websites:
Angry Alien, Blennus, Blip.tv, Break.com, Dailymotion, Double Agent, Google Video, iFilm, Metacafe, MySpace, Putfile, Totally Crap, vidiLife, vSocial, AnimeEpisodes.Net, Badjojo, Blastro, Bofunk, CollegeHumor, Current TV, Dachix, Danerd, DailySixer.com, DevilDucky, Double Agent, EVTV1, FindVideos, Kontraband, Lulu TV, Midis.biz, Music.com, MusicVideoCodes.info, Newgrounds, NothingToxic, Pixparty, PlsThx, Revver, Sharkle, SmitHappens, StreetFire, That Video Site, VideoCodesWorld, VideoCodeZone, Vimeo, Yikers, YouTube, ZippyVideos,
Download Bywifi Video Downloader v1.3.10 | 4.60 MB
Read more “Bywifi Video Downloader v1.3.10” »»
Minilyrics 6.3.179
 An application that helps you view the lyrics of your favorite songs.
MiniLyrics is a fascinating lyrics viewer for synchronizing and displaying lyrics of the currently playing song in Winamp 2.0/3.0, Winamp 5.x, Windows Media Player, itunes, matchbox, Quintessenial Player, foobar2000.
RealOne Minilyrics makes your music come alive with streaming lyrics that are timed with the song.
You can follow along with the artist and catch every word,and even sing along like a Karaoke machine.
Minilyrics is an application that helps you to view lyrics of your favorite songs.
Minilyrics is Powerful : Minilyrics is fully compatible with all major music players, like Winamp, Windows Media Player, etc.
Minilyrics is Simple to use: As the easiest-to-use Lyrics viewer software, Minilyrics only needs a few steps to install and take you less than 5 mins to have a full version ready for use.
Whenever you launch the any of the media players, the software will automatically get started.
Minilyrics lets you select your favorite skins, fonts, colors and minimize the viewer window to whatever size that you feel comfortable with. The karaoke mode brings you tremendous joy in learning a song by moving the lyrics word by word.
MiniLyrics supports:
■ Winamp
■ Windows Media Player
■ Foobar2000
■ Apple iTunes
■ RealPlayer
■ Quintessential Player
■ Musicmatch Jukebox
■ MediaMonkey
■ The KMPlayer
■ JetAudio
■ Yahoo! Music Engine
■ J. River Media Center
■ J. River Media Jukebox
■ XMPlay
■ BSPlayer
Here are some key features of "Minilyrics":
· Automatic lyrics display for your favorite songs
· Never expired trial version
· Cool skins
· Wild compatibility for 13 players
Requirements:
· One of the supported players must be installed in order to run Minilyrics
Limitations:
· Registration reminder screen
What's New in This Release: [ read full changelog ]
· New: Support VLC Player.
· Improved: Floating lyrics and lyrics bar mode of skins.
· Fixed: memory leak on loading Album Art.
· Fixed: Context menu in lyrics editor
· Fixed: The option of not checking new version can't be applied
· Fixed: Caret drawing bug.
· Fixed: The scrollbar of lyrics editor is not available in "Windows" Skin.
Download Minilyrics 6.3.179
Read more “Minilyrics 6.3.179” »»
USB Safely Remove 4.0.976 Final
 USB Safely Remove is a USB device manager. It saves time and extends user abilities on active work with flash drives, portable drives, card readers and other gadgets.
-A handy menu to stop devices
The main disadvantage of using built-in Windows safe removal tool is that in case of having several hot-plug devices it is quite difficult to recognize a needed to stop device - the most devices have the same name - "USB mass storage device". In addition, Windows does not let you hide a device you would not want to stop from the menu
USB Safely Remove saves you from these problems and offers an original and multifunctional stopping menu, which displays actual device names with icons. Using this menu you can find and stop a device in a snap!
Download USB safely remove 4 final
Read more “USB Safely Remove 4.0.976 Final” »»
Saturday, 14 February 2009
Cara Memasang google adsense for search di Blogspot
 Fasilitas pencarian pada blog sangat penting, hal ini bertujuan untuk memudahkan pengunjung blog untuk mencari apa yang di butuhkan. Jika anda adalah publisher google adsense , maka anda tinggal memanfaatkan google adsense for search menjadi widget pada blog anda , tentunya juga bisa menambah penghasilan google adsense anda. Karena jika pengunjung melakukan pencarian dengan menggunakan layanan google adsense search dan kebetulan mengklik ads pada hasil pencarian maka earning anda akan bertambah layaknya adsense for content.
Bagaimana cara memasang google adsense for search pada blogspot ? caranya sangat mudah.
- Silahkan Log in ke account google adsense anda
- Klik tab konfigurasi adsense
- pilih adsense untuk penelusuran
- Isi form apa saja yang di perlukan , seperti keyword atau kata kunci dan yang lainnya
- Klik lanjut
- Pilih bentuk Logo
- Pilih ukuran panjang kotak teks , secara default angaknya 31 karakter , tapi bisa anda ganti sesuai dengan keinginan anda
- Klik lanjut dan masukan url blog anda pada url area
- setting warna tampilan
- Lanjut
Ceklist tombol pada Penggunaan fitur AdSense untuk Pencarian ini diatur olehtarget persyaratan tambahan. Dengan mencentang kotak ini dan mengklik 'Kirim', Anda menyetujui persyaratan tersebut.
Klik tombol kirim dan dapatkan kode
Setelah anda mengklik tombol "kirimkan dan dapatkan kode" maka akan muncul new windows yang berisi kode pencarian yang bisa langsung anda pasang di blog anda.
Cara memasang kode adsense search pada blogspot :
- Log in ke account blogger anda
- pilih layout
- Klik tombol add a gadget
- Pilih HTML/JavaScript
- Maka akan muncul new windows , masukan kode adsense anda pada text area tersebut ,
- Save
- Google adsense for search sudah terpasang di blogspot anda
Selamat mencoba
Read more “Cara Memasang google adsense for search di Blogspot” »»
Friday, 13 February 2009
How To Install windows xp Using USB Flashdisk
Kemarin windows saya eror,,mau ga mau saya harus install ulang lagih , Masalahnya Drive DVD saya rusak , jadi saya install menggunakan flashdisk aja.
Di postingan saya sebelumnya saya juga sudah membuat tutorial bagaimana cara menginstall windows xp menggunakan flashdisk , Mungkin masih banyak yang bingung karena di postingan saya tersebut tidak menggunakan sreenshot. Kali ini saya coba untuk membuat tutorial yang sama dengan mempermudah proses kerjanya.
Persiapan apa saja yang perlu di lakukan ? silahkan anda baca di disini , dan salin ke Microsoft word atau Notepad untuk lebih memudahkan.
Download software yang di perlukan :
1. PeToUSB
2. BootSect
3. USB_Prep8
Lets go...follow this step
BAGIAN 1 - Pemformatan
1. masukan flashdisk ke dalam usb port
2. ekstract semua software yang sudah di download tadi ke dalam sebuah folder di direktory hardisk anda ,misalnya di D , Beri nama folder tersebut ,misalnya USB.
Untuk mengekstraknya anda bisa menggunakan software ekstrasi seperti winzip atau winrar.
3.Copy file PE2USB.exe yang ada di dalam folder PE2USB ke dalam folder USB_PREP8. USB_PREP8 akan menggunakan PE2USB dalam proses instalasi.
Kemudian Double click file usb_prep8.cmd yang ada di dalam folder USB_PREP8.
Maka akan muncul windows pada monitor anda seperti gambar
Tekan tombol keyboard apa saja untuk melanjutkan.( ikuti saja perintahnya ), Window PE2USB akan muncul pada monitor anda. Anda tidak perlu mengubah apapun.
Click tombol Start , kemudian tekan tombol Yes
Setelah format selesai tutup windows PEtoUSB , Ingat !!! hanya jendela PEtoUSB saja , jangan menutup jendela Command Prompt. Maka akan muncul comand seperti gambar di bawah
4.Kemudian masukan CD Windows XP anda
- Tekan 1 untuk memilih drive dimana file instalasi windows berada, ( Change XP Setup Source Path, currently )
Sebuah window akan muncul dan pilih dimana drive yang berisi CD Setup Windows XP anda. Klik [OK].misalnya di E , klik di situ,ok
- Kemudian pilih menu nomor 3) Change Target USB-Drive Letter, currently
Ketik huruf drive yang berisi USB Flash Disk anda. Dalam contoh saya adalah drive F :
- Setelah selesai pilih menu nomor 4 Make New TempImage with XP LocalSource and Copy to USB-Drive - Tekan Y untuk memulai pemformatan
- Tekan tombol apa saja untuk melanjutkan proses
Tekan yes untuk menyalin file temporary ke usb
Yes lagi
Yes lagi
Setelah itu tekan tombol apa aja untuk mengakhiri semua proses..
BAGIAN II – Instalasi
1. Sebelum anda mulai melakukan instalasi pastikan bahwa urutan booting anda sudah diatur supaya first bootnya dari USB Flash Disk.
masuk aja ke menu BIOS. Caranya,hidupkan komputer/laptop anda,tekan F2 setelah beberapa saat komp/lap di hidupkan
2. Setelah masuk ke dalam BIOS pilih menu yang sesuai, kalo ga salah ada di menu “boot order”
3. Dalam menu Boot Order anda dapat memilih urutan boot yang diperlukan yaitu 1. USB Hard Drive/Flash Drive, urutan nomor 2 bisa yang lainnya tetapi biasanya anda isi dengan DVD/CD Drive.
4. Klik Save and Exit, komputer akan restart.
5. Jika semua berjalan lancar, pada saat menyala kembali komputer akan melakukan boot dari USB Flash Drive anda dan akan muncul menu pilihan
6. Pilih menu [TXT Mode Setup Windows XP, Never Unplug USB Drive Until After Logon].
PENTING: Jangan mencabut USB Flash Drive sampai instalasi Windows XP sudah selesai seluruhnya.
7. Setup Windows XP akan dimulai. Kerjakan seperti jika anda menggunakan CD.sama persis,ikuti aja petunjuknya.
8. Setelah setup selesai menyalin file-file ke dalam harddisk anda, setup akan melakukan restart komputer.
9. PENTING: Pilih menu [GUI Mode Setup Windows XP, Continue Setup + Start XP].
Setup Windows akan melanjutkan setup dengan menggunakan tampilan GUI (Graphical User Interface) sambil tetap menyalin dari USB Flash Drive.
10. Lanjutkan instalasi seperti biasanya . Jika sudah selesai anda dapat mencabut USB Flash Drive. UFD anda tersebut dapat digunakan untuk melakukan repair Windows XP.
Read more “How To Install windows xp Using USB Flashdisk” »»